Have you ever found yourself stuck in a parking lot with a car that just won’t start? It’s a frustrating situation that no one wants to deal with.
But what if you could prevent this nightmare with just a simple tool? Enter the multimeter—a handy device that can help you keep your car battery in check. If you’re wondering how to test your car battery with a multimeter, you’re in the right place.
Imagine the peace of mind you’ll have knowing that your car battery is in top condition. No more unexpected breakdowns or costly replacements. In this guide, we’ll walk you through the easy steps to test your car battery using a multimeter. It’s simpler than you think, and once you learn how, you’ll wonder how you ever managed without this knowledge. So, are you ready to take control of your car’s health and keep it running smoothly? Let’s dive in and unlock the secrets to a reliable ride.
Tools And Equipment
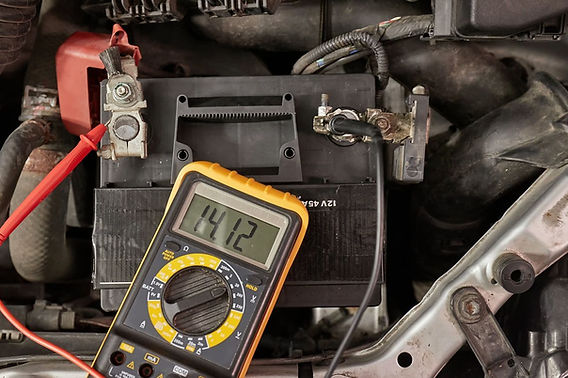
Testing a car battery with a multimeter is simple and essential. First, set the multimeter to 20 DC volts. Then, connect the red probe to the battery’s positive terminal and the black probe to the negative terminal. A reading of 12.
6 volts or higher indicates a fully charged battery.
Testing a car battery with a multimeter requires the right tools and equipment. Each item plays a crucial role in ensuring accurate readings and safety. Having the correct gear simplifies the process and enhances reliability. Below, explore the essential tools for testing your car battery.
Multimeter Selection
Choosing the right multimeter is essential. A digital multimeter is preferred for its accuracy. It displays readings clearly, reducing errors. Select one with a voltage range that covers 12 volts. This is ideal for car batteries. Ensure it has sturdy probes for easy connection. Probes should be insulated to prevent electric shocks. Look for a multimeter with auto-ranging capabilities. It simplifies the process, adjusting settings automatically. This feature is particularly helpful for beginners.
Safety Gear
Safety gear is vital when testing car batteries. Always wear protective gloves. They shield your hands from acid and electrical shocks. Use goggles to protect your eyes. Car batteries can sometimes leak acid. It’s important to avoid direct contact with battery terminals. They may carry a charge. Wearing long sleeves can provide additional protection. Ensure your work area is dry and free from metal objects. This prevents accidental short circuits. Safety gear should never be overlooked. It ensures your testing process is both safe and effective.
Safety Precautions
Testing a car battery with a multimeter involves electricity. This can be dangerous without proper precautions. Understanding safety measures is crucial. Here, we explore essential precautions to ensure safety. Wear appropriate protective clothing and choose a safe working environment. These steps help prevent accidents and injuries.
Protective Clothing
Always wear protective gear. Start with insulated gloves. They protect against electric shock. Safety goggles shield your eyes from sparks. Wear long sleeves and pants to cover your skin. This clothing minimizes exposure to harmful elements.
Working Environment
Choose a well-lit area to work in. Ensure the space is dry and free from moisture. Water increases the risk of electric shock. Keep flammable materials away. Batteries can emit gases which are flammable. Ensure proper ventilation to disperse these gases. A tidy workspace reduces tripping hazards. Organize tools and equipment for easy access.
Preparing The Car Battery
Testing a car battery with a multimeter involves simple steps. First, ensure the battery is clean and dry. Connect the multimeter probes to the battery terminals to check voltage levels.
Preparing your car battery for testing is a crucial step in ensuring accurate results when using a multimeter. Before you dive into the process, it’s essential to create a safe and effective environment for testing. This preparation not only safeguards your vehicle but also enhances your confidence as you work with the car battery.
Ensure Car Is Off
Before doing anything, make sure your car is completely off. This means turning off the ignition and removing the keys. It’s a simple yet vital step—working on a live system can be dangerous, and it can skew your test results. Once your car is off, give the vehicle a moment to settle. You wouldn’t want any residual power affecting your readings. Have you ever noticed how devices sometimes need a moment to fully power down? The same logic applies here.
Locate The Battery
Finding your car battery might seem like a no-brainer, but it’s worth noting that its location can vary. In most cars, you’ll find it under the hood. However, some vehicles have them tucked away in the trunk or even under a seat. If you’re unsure, consult your car’s manual. It’s your go-to guide and can save you time and frustration. Once located, take a moment to inspect the battery for any obvious issues like leaks or corrosion, as these can affect the testing process. By ensuring your car is off and correctly locating the battery, you’re setting the stage for a smooth and successful battery test. Are you ready to see how your battery is performing? Let’s move on to testing with your multimeter.
Setting Up The Multimeter
Begin by setting your multimeter to the 20V DC range. This setting is ideal for car batteries. Ensure the multimeter is ready for accurate voltage readings.
Setting up the multimeter is a crucial first step in testing your car battery. A multimeter might seem intimidating with its various knobs and buttons, but it’s easier than you might think. Whether you’re a seasoned mechanic or a complete novice, understanding how to set it up properly can save you time and ensure accurate readings.
Adjusting The Settings
Begin by turning the dial to the DC voltage setting. This is usually denoted by a V with a straight line above it. Since car batteries are direct current (DC), this is essential to get a correct reading. Set the voltage range to 20 volts. Most car batteries are 12 volts, so setting it to 20 ensures you capture a range that includes your battery’s voltage without risking damage to the multimeter. Double-check that your multimeter leads are connected correctly. The red lead should be in the VΩmA port, and the black lead should be in the COM port. This is a common mistake that can lead to incorrect readings.
Understanding The Display
Once your multimeter is set, it’s time to look at the display. The digital screen will show the battery’s voltage once the leads are connected to the battery terminals. Pay attention to any symbols that might appear. If you see a negative sign, it means the leads are reversed—swap them around to get a positive reading. A reading of around 12.6 volts means your battery is fully charged. If it’s significantly lower, it might be time to consider a replacement. How confident do you feel reading these numbers now? With practice, you’ll find that using a multimeter becomes second nature. And when those unexpected car troubles arise, you’ll be ready to diagnose them like a pro.
Testing Battery Voltage
To test car battery voltage with a multimeter, connect the multimeter’s probes to the battery terminals. Ensure the multimeter is set to measure DC voltage. A healthy battery typically shows a reading between 12. 4 and 12. 7 volts.
Testing the voltage of a car battery is crucial. It helps determine the battery’s health. A multimeter is the perfect tool for this task. This handy device measures the voltage. It gives a clear picture of the battery’s condition. Proper testing can prevent unexpected breakdowns. Regular checks ensure your battery is in good shape.
Connecting The Probes
Begin by setting the multimeter to DC voltage. Most car batteries are 12 volts. Locate the battery terminals. The positive terminal usually has a plus sign. The negative terminal has a minus sign. Attach the red probe to the positive terminal. Connect the black probe to the negative terminal. Ensure a firm connection for accurate results.
Interpreting The Results
After connecting, observe the multimeter display. A reading between 12.4 and 12.7 volts is ideal. This indicates a fully charged battery. If the reading is below 12.4 volts, the battery might need charging. A reading under 12 volts suggests a weak battery. Consider replacing it soon. Results above 12.7 volts could mean overcharging. This requires immediate attention. Understanding these numbers helps maintain battery health.

Credit: www.youtube.com
Checking For Battery Health
Testing your car battery with a multimeter helps ensure it’s in good health. Regular checks can prevent unexpected breakdowns. Understanding the battery’s condition is crucial for reliable performance. With a multimeter, you can check the voltage and diagnose potential issues. This tool offers a quick way to assess your battery’s health.
Comparing Voltage Readings
Start by setting your multimeter to read DC voltage. Connect the red lead to the battery’s positive terminal and the black lead to the negative terminal. Record the voltage displayed on the multimeter. A healthy battery typically shows a reading between 12.4 to 12.7 volts. If your reading is below 12 volts, it might indicate a weak or discharged battery.
Compare this reading with your car manual’s specifications. This helps determine if your battery meets the required standards. High voltage readings can signal overcharging, while low readings may suggest undercharging. Consistent low readings might mean your battery needs replacing.
Diagnosing Potential Issues
If your battery shows irregular voltage, further diagnosis is needed. Check for corrosion on the terminals. Corroded terminals can prevent proper connection and affect voltage readings. Clean any corrosion with a mixture of baking soda and water.
Test for parasitic drain by disconnecting the battery and measuring voltage again. If voltage improves, it indicates a drain somewhere in the system. Inspect your vehicle for electrical issues or faulty components that could cause this drain.
Regular testing keeps your car battery healthy and helps avoid surprises. It ensures your vehicle runs smoothly and reliably. Use these methods to maintain your battery’s health and extend its lifespan.
Maintaining Battery Performance
Testing a car battery with a multimeter ensures optimal performance. Set the multimeter to DC voltage, connect the probes, and check the reading. A healthy battery typically displays between 12. 4 and 12. 7 volts.
Maintaining your car battery’s performance is vital for ensuring that your vehicle runs smoothly. A well-maintained battery means fewer surprises on the road and saves you from unexpected breakdowns. Regular testing and understanding when it’s time for a replacement are key steps in keeping your car reliable.
Regular Testing Routine
Make it a habit to test your car battery every few months. Start by using a multimeter to check the voltage. Ensure the car is off before you begin. Set the multimeter to DC volts, place the red probe on the battery’s positive terminal, and the black probe on the negative terminal. A healthy battery typically shows a reading between 12.4 and 12.7 volts. If you notice the voltage dipping below 12.4 volts, it might be time to take action. Consider charging the battery or getting it checked by a professional. Regular testing helps you catch issues early, avoiding major inconveniences.
Identifying When To Replace
Sometimes, even with regular testing, your battery may still need replacement. Look out for warning signs such as slow engine cranking or dimming headlights. These can indicate that your battery is struggling. A voltage reading consistently below 12 volts is another strong signal that replacement might be necessary. Don’t wait until you are stranded. If you notice these signs, plan for a replacement soon. A proactive approach can save you from stressful situations on the road. By maintaining a regular testing routine and knowing when to replace your battery, you keep your car in peak condition. After all, a little attention now can prevent a lot of trouble later.

Credit: www.batteriesplus.com
Troubleshooting Tips
Testing a car battery with a multimeter is simple. First, set the multimeter to DC voltage. Then, connect the probes to the battery terminals. Check the reading; a healthy battery should show around 12. 6 volts. If lower, the battery might need charging or replacement.
Troubleshooting your car battery can prevent unexpected breakdowns. Using a multimeter, you can identify issues early. Knowing what to look for saves time and stress.
Common Errors
Many make mistakes when testing car batteries. One error is not setting the multimeter to the correct mode. Always choose the DC voltage setting. Another common mistake is connecting the probes incorrectly. The red probe goes to the positive terminal, and the black to the negative. Incorrect connections can cause inaccurate readings. Misreading the multimeter display is also frequent. Ensure you understand the voltage level that indicates a healthy battery.
When To Seek Professional Help
Sometimes, professional help is necessary. If your battery shows low voltage despite charging, consult a mechanic. Strange smells or leaking fluid from the battery indicate serious issues. A professional can diagnose these problems safely. Also, if your car has electrical problems beyond the battery, expert advice is best. They have the tools and knowledge to solve complex issues.

Credit: www.youtube.com
Frequently Asked Questions
How Do I Use A Multimeter On A Car Battery?
Using a multimeter is simple. Set it to DC voltage, connect the red probe to the battery’s positive terminal and the black probe to the negative terminal. A reading between 12. 4 to 12. 6 volts means your battery is healthy.
If lower, it may need charging or replacement.
What Should A Car Battery Read On A Multimeter?
A healthy car battery should read between 12. 4 and 12. 6 volts on a multimeter. If the reading is below 12. 4 volts, the battery might be undercharged. A reading below 12 volts indicates the battery is discharged and may need replacement if it doesn’t recharge properly.
Can A Multimeter Check Battery Health?
Yes, a multimeter can check battery health. By measuring the voltage, you can assess the battery’s condition. A fully charged battery will read between 12. 4 and 12. 6 volts. Lower readings might indicate issues like undercharging, sulfation, or the need for battery replacement.
Why Is My Battery Voltage Low?
Low battery voltage might be due to several factors. Common causes include battery age, electrical drain, or a faulty alternator. Regularly checking the battery with a multimeter can help diagnose these issues early, ensuring timely maintenance or replacement before a complete failure occurs.
Conclusion
Testing your car battery with a multimeter is simple. Follow the steps carefully. It helps you spot battery issues early. Save time and avoid unexpected breakdowns. A multimeter is a handy tool for this task. Regular checks keep your car running smoothly.
It’s important to keep your battery healthy. Doing this ensures your car is reliable. Anyone can learn this method easily. Start testing today and drive with peace of mind. Your car will thank you for it.