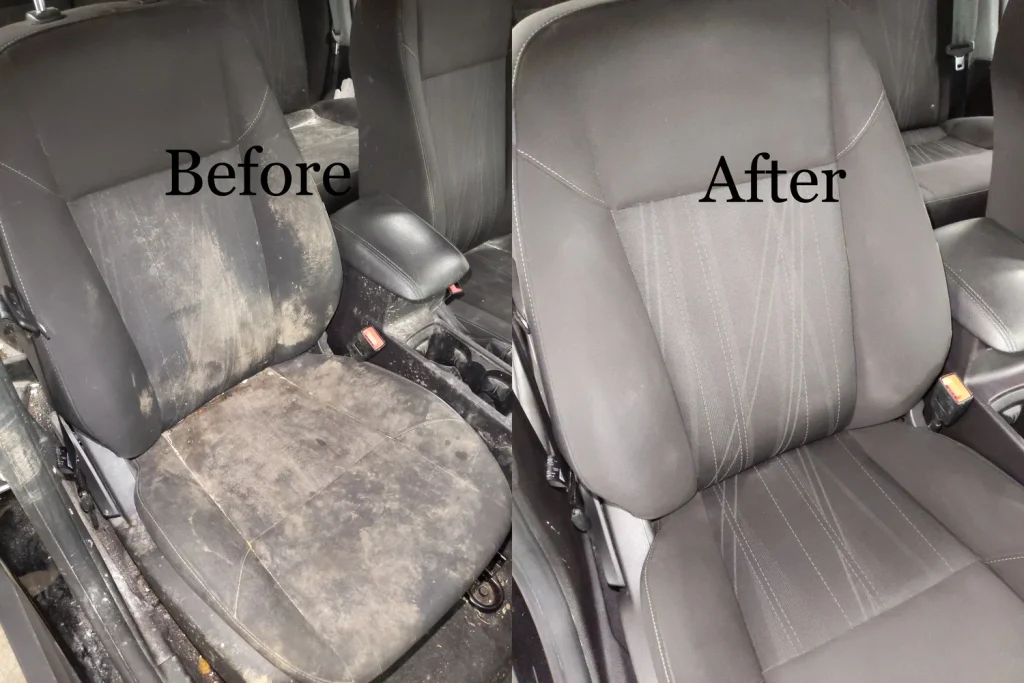
Your car seats take a beating every day. From spills and stains to dirt and dust, they quickly lose their fresh look.
But here’s the good news: cleaning your car seats doesn’t have to be a hassle. With the right tips and simple steps, you can restore your seats to look and feel like new. Ready to give your car that clean, fresh upgrade?
Keep reading, and you’ll discover easy ways to tackle seat stains and keep your ride comfortable and inviting.

Credit: www.carsales.com.au
Preparing Your Car Seats
Preparing your car seats properly sets the stage for effective cleaning. It helps avoid damage and ensures dirt comes out easily. Taking time to prep makes the process quicker and more thorough. The right steps protect your seats and improve the final look.
Gathering Cleaning Supplies
Start by collecting all needed cleaning tools. Have a vacuum, soft brushes, microfiber cloths, and mild cleaners ready. Choose products safe for your car’s seat material. Keep a bucket of warm water nearby for rinsing cloths. Organizing supplies beforehand saves time and prevents interruptions.
Removing Loose Debris
Clear loose dirt and crumbs from the seats first. Use a vacuum with a brush attachment to reach tight spots. Gently brush off any dust or pet hair. This step stops dirt from spreading during cleaning. It also helps the cleaner work better on tough stains.
Checking Seat Material
Identify the type of material on your seats. Common types include leather, cloth, vinyl, or suede. Each needs different cleaning methods and products. Read the car manual or look for tags on the seats. Testing cleaners on a small hidden area prevents damage.

Credit: blisscarwash.com
Cleaning Fabric Seats
Cleaning fabric seats in your car can seem tricky, but it doesn’t have to be. Fabric traps dirt, dust, and spills more easily than leather or vinyl, so regular care helps keep your seats fresh and comfortable. A little attention goes a long way in preventing stains from setting and odors from lingering.
Vacuuming Thoroughly
Start by vacuuming your fabric seats carefully. Use a vacuum with a brush attachment to lift dirt from the fibers without damaging them. Pay special attention to seams and crevices where crumbs and debris hide.
Have you noticed how much dust collects in those hard-to-reach spots? Removing this buildup first makes the next cleaning steps more effective and prevents dirt from turning into stubborn stains.
Using A Fabric Cleaner
Select a fabric cleaner designed specifically for car upholstery. Spray it evenly over the seat surface, avoiding over-saturation to prevent soaking the padding beneath. Use a soft brush or cloth to gently work the cleaner into the fabric in circular motions.
Test the cleaner on a small, hidden area first to check for colorfastness. This simple precaution can save you from accidental discoloration.
Spot Treating Stains
Stains require immediate attention. Dab the stain with a cleaner or a mix of water and mild detergent, then blot gently with a clean cloth. Avoid rubbing hard, as this can spread the stain or damage fabric fibers.
For tough stains like coffee or ink, consider using specialized stain removers, but always read the instructions carefully. What’s your go-to trick for stubborn spots?
Drying Tips
After cleaning, allow your fabric seats to dry completely before using the car. Open windows or doors to improve air circulation and speed up drying. Avoid direct sunlight, which can fade colors and weaken fabric over time.
If you’re in a hurry, a portable fan or using your car’s air conditioning on a cool setting can help. Proper drying prevents mold and odors from developing, ensuring your seats stay fresh longer.
Cleaning Leather Seats
Leather seats add a touch of luxury to your car, but they also require special care to keep them looking fresh and supple. Unlike fabric, leather can crack or fade if not cleaned properly. Taking the time to clean and maintain your leather seats not only preserves their appearance but also extends their lifespan.
Wiping Down With A Damp Cloth
Start by gently wiping your leather seats with a soft, damp cloth. This removes surface dust, dirt, and oils without damaging the leather. Avoid soaking the cloth; too much water can seep into the leather and cause stains or stiffness.
Try to use distilled water if possible, as tap water may contain minerals that leave spots. I once skipped this step and ended up with watermarks that were tough to remove later. A quick wipe with a barely wet cloth can save you from that hassle.
Applying Leather Cleaner
Choose a cleaner specifically made for leather, not general household products. Apply a small amount to a microfiber cloth and gently rub it into the seat in circular motions. This helps lift dirt and oils trapped in the pores of the leather.
Test the cleaner on a small hidden area first to check for any discoloration. If you notice any color change, stop immediately. Using the right cleaner protects your investment and keeps the leather soft and vibrant.
Conditioning The Leather
After cleaning, apply a leather conditioner to replenish moisture and prevent cracking. Use a clean cloth to spread the conditioner evenly, paying extra attention to worn or dry spots. Conditioning creates a protective barrier, making the leather more resistant to spills and stains.
How often do you condition your seats? Skipping this step can make your leather feel stiff and prone to damage. I noticed a big difference in comfort and look after I started conditioning regularly.
Avoiding Common Mistakes
- Don’t use harsh chemicals like bleach or ammonia—they strip natural oils and damage leather.
- Avoid scrubbing aggressively; leather is delicate and can scratch or peel.
- Never use too much water; it can cause water stains or mold growth.
- Don’t skip conditioning—it’s easy to forget but vital for leather health.
- Avoid cleaning in direct sunlight, which can dry out and fade the leather quickly.
Have you ever cleaned your leather seats and noticed they felt rough afterward? Chances are, one of these mistakes was the cause. Taking a gentle, consistent approach will keep your seats looking and feeling their best for years.

Credit: m.youtube.com
Cleaning Vinyl And Synthetic Seats
Vinyl and synthetic car seats clean easily with mild soap and warm water. Gently scrub stains using a soft cloth or sponge. Dry seats thoroughly to prevent damage and keep them looking fresh.
Cleaning vinyl and synthetic seats in your car can be a straightforward task if you know the right steps. These materials are durable, but they need the right care to maintain their look and longevity. Whether you’re dealing with spills, dirt, or just routine maintenance, it’s essential to use the proper techniques to keep your seats looking new.
Choosing The Right Cleaner
The first step in cleaning vinyl and synthetic seats is selecting a suitable cleaner. Not all products are created equal, and using the wrong one can cause damage. Opt for a gentle cleaner specifically designed for vinyl or synthetic materials. You can find these at most automotive stores or online. Always do a patch test in an inconspicuous area to ensure the cleaner doesn’t discolor or damage your seats. Remember, a cleaner that works well on one type of seat might not work on another.
Scrubbing And Rinsing
Once you’ve chosen your cleaner, it’s time to get scrubbing. Use a soft-bristled brush or a microfiber cloth to apply the cleaner. Gently work it into the surface, focusing on any stained or soiled areas. Avoid using excessive force, as this can scratch or damage the seat material. After scrubbing, rinse the seats with a damp cloth to remove any residue. Be sure to dry them thoroughly with a clean towel to prevent water spots.
Preventing Cracks And Fading
Preventing cracks and fading in vinyl and synthetic seats is key to extending their life. Regular cleaning is crucial, but so is applying a UV protectant. This step is often overlooked but can make a significant difference. UV rays from the sun can cause your seats to fade and crack over time. Applying a protectant designed for vinyl and synthetic materials will shield them from harmful rays. Do this every few months, especially if you park your car in direct sunlight frequently. Taking these steps can keep your seats looking vibrant and new. Have you checked your seats lately? Maybe it’s time to give them the TLC they deserve.
Dealing With Tough Stains
Tough stains on car seats can be frustrating and stubborn. They often require more than just a quick wipe to completely remove. Understanding the right approach to different types of stains will save you time and keep your car looking fresh.
Removing Ink And Dye
Ink and dye stains are among the hardest to clean because they soak deep into the fabric. Start by blotting the stain gently with a clean cloth to avoid spreading it further. Then, apply a small amount of rubbing alcohol or a specialized ink remover using a cotton swab, working from the outside in.
Be patient and repeat the process, but avoid rubbing harshly as it can damage the seat material. Have you ever tried using hairspray on ink stains? It can work, but test it on a hidden spot first to ensure it doesn’t discolor your seat.
Eliminating Food And Drink Spills
Food and drink spills often leave sticky residues and unpleasant odors. Begin by scraping off any solid bits gently with a spoon or dull knife. Next, mix warm water with a few drops of mild dish soap and use a soft cloth to blot the stain.
For stubborn stains, a solution of equal parts water and white vinegar can work wonders. Remember to avoid soaking the seat too much; excess moisture can lead to mold or mildew.
Handling Pet Stains And Odors
Pet stains are tricky because they combine both visible stains and odors. Start by absorbing any wet spots with paper towels—press down firmly but don’t rub. Then, apply an enzymatic cleaner designed specifically for pet stains to break down the proteins causing the smell.
If you don’t have a commercial cleaner, a mixture of baking soda and water can help neutralize odors. Have you noticed that sometimes the smell lingers despite cleaning? Giving the seat time to air out after treatment often makes a big difference.
Maintaining Spotless Seats
Maintaining spotless seats keeps your car looking fresh and inviting. Clean seats improve your comfort and protect the fabric or leather. Regular care stops stains and dirt from settling deep into the material.
Small efforts every day can make a big difference. Follow simple habits to keep your car seats clean and fresh for longer.
Regular Vacuuming Routine
Vacuuming removes dust, crumbs, and small debris from your seats. Use a vacuum with a soft brush attachment to avoid damage. Focus on seams and crevices where dirt collects.
Vacuum your car seats at least once a week. This prevents buildup and keeps the fabric looking new. Don’t forget to vacuum under the seats and around the edges.
Using Seat Covers
Seat covers protect your car seats from spills and stains. Choose covers that fit well and are easy to remove. Wash or clean the covers regularly to keep them fresh.
Seat covers also help prevent wear and tear. They save you time cleaning the original upholstery. Change covers if they become too dirty or worn out.
Quick Clean-up Tips
- Blot spills immediately with a clean cloth to avoid stains.
- Use mild soap and water for spot cleaning small stains.
- A soft brush helps lift dirt without harming the fabric.
- Dry the seat well after cleaning to prevent mold and odors.
- Keep cleaning wipes in your car for fast touch-ups.
Frequently Asked Questions
How Do I Clean Leather Car Seats Effectively?
Use a gentle leather cleaner and a soft cloth. Avoid harsh chemicals to prevent damage. Condition seats after cleaning to keep leather supple and prevent cracking.
What Is The Best Way To Remove Stains From Fabric Seats?
Blot stains immediately with a clean cloth. Use a mixture of mild soap and water. Scrub gently with a soft brush and rinse with a damp cloth.
Can I Use Household Cleaners On Car Seats?
Avoid using strong household cleaners as they may damage seat fabric or leather. Use products specifically designed for car upholstery for safe and effective cleaning.
How Often Should Car Seats Be Cleaned?
Clean car seats every 3 to 6 months to maintain appearance. Spot clean stains promptly to prevent permanent damage and odors.
Conclusion
Cleaning car seats keeps your vehicle fresh and comfortable. Regular care stops dirt and stains from building up. Use gentle cleaners to protect the seat material. Dry seats fully to avoid bad smells and damage. Small efforts add up to a cleaner, nicer car.
Keep your car inviting for every trip. Simple steps make a big difference in seat care. Try these tips and enjoy a neat ride daily.