Imagine you’re on the road, ready to charge your phone or power your GPS, only to find that your car lighter socket isn’t working. Frustrating, right?
But don’t worry, you’re not alone, and the solution is within reach. Learning how to replace your car lighter socket can save you time, money, and the hassle of a trip to the mechanic. You’ll discover simple steps to get your socket back in shape quickly.
Whether you’re a seasoned DIY enthusiast or a complete newbie, we’ve got you covered with clear instructions and practical tips. So, why wait? Dive in and empower yourself with the know-how to keep your car accessories running smoothly.

Credit: www.walmart.com
Tools And Materials Needed
Gather essential tools such as a screwdriver and pliers for replacing the car lighter socket. Ensure you have a new socket and wiring kit for installation. These materials simplify the process and ensure a secure connection.
Replacing a car lighter socket is a straightforward task. It requires only basic tools and materials. Having the right items ensures a smooth process. Before starting, gather everything you need. This helps save time and avoids frustration. Let’s explore the essentials for this job.
Basic Tools
First, you need a screwdriver. A Phillips or flat-head will work depending on the car model. Also, have a pair of pliers handy. They help in removing and securing wires. A multimeter is useful for checking electrical connections. If you don’t have one, consider borrowing or purchasing it.
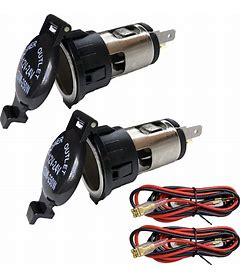
Replacement Socket
You’ll need a new car lighter socket. Ensure it matches your car’s specifications. Check the size and voltage compatibility. This prevents issues after installation. You can find replacements at auto parts stores or online retailers.
Wire Connectors
Wire connectors are important for secure connections. Get a few in case you need extras. They ensure wires stay in place and function properly. Look for connectors that are easy to install and durable.
Electrical Tape
Electrical tape is useful for insulation. It prevents short circuits and protects connections. Have a roll ready for wrapping exposed wires. This adds an extra layer of safety.
Safety Gear
Safety gear is crucial during electrical work. Wear safety glasses to protect your eyes. Gloves can prevent electrical shocks and improve grip. Always prioritize safety while working.
Optional Items
A flashlight can be handy for better visibility. Use it in dimly lit areas. Also, a small box or tray helps organize screws and parts. Keeping items together prevents loss and confusion. Gather these tools and materials before starting the replacement. This preparation ensures a smooth and efficient process.

Credit: www.affordablesupercar.com
Safety Precautions
Wearing gloves and disconnecting the car battery ensure safety when replacing the car lighter socket. Use insulated tools to avoid electric shock. Ensure the vehicle is parked on a flat surface to prevent accidents.
Replacing a car lighter socket is a simple task. Yet, safety should always be your top priority. Electrical components can pose risks if handled improperly. It is essential to follow safety precautions before diving into the replacement process. By ensuring a safe environment, you protect yourself and your vehicle from potential hazards.
Disconnect The Battery
Always disconnect the car battery before starting. This prevents electrical shocks. Use a wrench to remove the negative cable first. This step cuts off the power supply to the socket.
Ensure The Car Is On A Flat Surface
Park your car on a flat surface. This prevents unexpected movements. Engage the parking brake for added security.
Wear Protective Gear
Wear gloves to protect your hands. Safety goggles shield your eyes from dust and debris. These protective measures keep you safe during the replacement.
Check The Car’s Manual
Refer to your car’s manual for specific instructions. The manual provides details unique to your vehicle model. This ensures you follow the correct procedures.
Use The Right Tools
Use tools that fit well and are in good condition. This prevents damage to the socket and surrounding areas. A proper grip reduces the risk of slipping.
Avoid Wet Conditions
Do not work in wet conditions. Water and electricity do not mix well. Ensure your work area is dry and safe.
Inspect The New Socket
Check the new socket for any defects. Ensure it matches the old one. A proper fit is crucial for functionality and safety.
Locating The Lighter Socket
Locating the lighter socket is crucial in replacing it. Typically found in the dashboard or center console. Check your car manual for precise location details.
Locating the lighter socket in your car might seem like a straightforward task, but it can be a bit tricky, especially if you’re not familiar with your vehicle’s interior layout. Knowing exactly where to find it is crucial before you set out to replace it. Have you ever had that moment of panic, searching frantically for something right under your nose? Let’s prevent that by pinpointing its exact location.
Identify Your Car’s Model And Year
Start by understanding your car’s make, model, and year. This information can be found in your owner’s manual or on the manufacturer’s website. Different models have variations in interior design, which might affect the location of the lighter socket.
Consult Your Car’s Manual
The owner’s manual is your best friend here. It contains diagrams and details about the interior layout of your car. Check the section dedicated to the car’s dashboard or electrical components for precise guidance.
Check The Dashboard And Center Console
Typically, the lighter socket is located on the dashboard, often near the radio or air conditioning controls. If it’s not there, look at the center console between the driver and passenger seats. Many newer cars have them tucked away in this area for easy access.
Look For Secondary Locations
Some cars have additional lighter sockets in the back seat area or in the trunk. These are usually meant for passengers or charging items while on the go. Don’t overlook these spots if the primary socket is missing or inaccessible.
Use Online Forums And Communities
Online car enthusiast forums and communities can be a goldmine of information. Fellow car owners often share detailed insights and tips based on their personal experiences. You might find a detailed thread specific to your car model that highlights the lighter socket location. Locating the lighter socket may require a bit of detective work, but with these strategies, you’ll be well on your way to finding it quickly. Have you ever found an unexpected use for a lighter socket?

Credit: www.facebook.com
Removing The Old Socket
Disconnect the car battery to ensure safety. Locate the old lighter socket and remove any surrounding panels. Carefully detach the socket from its housing using the appropriate tools, ensuring wires remain intact.
Replacing a car lighter socket is a task that many car owners encounter, especially when the old socket becomes faulty or outdated. Whether you’re a seasoned DIY enthusiast or a beginner, removing the old socket is a crucial step. This process involves several key actions to ensure safety and efficiency. Let’s dive into the essential steps involved in removing the old socket.
Disconnecting The Battery
Before you start tinkering with the lighter socket, ensure your safety by disconnecting the car battery. This prevents electrical shocks and protects your vehicle’s electrical system. Simply locate the battery, usually under the hood, and use a wrench to loosen the negative terminal. You might feel a sense of accomplishment knowing you’ve taken the first step towards a safer car repair. Are you ready to roll up your sleeves and get to work?
Unscrewing The Socket
Once the battery is disconnected, it’s time to unscrew the old socket. Grab a screwdriver and gently twist the screws holding the socket in place. Take care not to strip the screws, as this can complicate the removal process. Remember, patience is key here. Feel the thrill as the screws come loose, one by one. Have you ever felt the satisfaction of seeing a problem dismantle before your eyes?
Detaching Wiring Connections
With the socket unscrewed, the next step involves detaching the wiring connections. Look for the wires connected to the back of the socket. Carefully disconnect them, noting their positions for easy reinstallation. These wires are like the veins of your car’s electrical system—handle them with care. Isn’t it fascinating how these small details can make a big impact on your vehicle’s functionality?
Installing The New Socket
Installing the new socket involves connecting the wires to the replacement car lighter socket. Ensure all connections are secure and test the socket for power.
Installing the new car lighter socket is a straightforward process that can breathe new life into your vehicle’s functionality. Whether you’re fixing a faulty socket or upgrading to one with additional features, this task can be completed with a few tools and a bit of patience. Before diving in, ensure you have the new socket, compatible with your car model, and gather any necessary tools like screwdrivers and pliers.
Attaching Wiring Connections
Begin by identifying the wiring harness connected to the old socket. Typically, there are two wires: one for power and another for grounding. Carefully connect these wires to the new socket, ensuring a snug fit to prevent any loose connections. If your new socket has additional features, like USB ports, ensure you connect any extra wires accordingly. Double-check that each wire is attached to the correct terminal to avoid any electrical issues.
Securing The Socket
Once the wiring is correctly connected, it’s time to secure the socket in place. Insert the new socket into the dashboard, aligning it with the existing hole. You may need to twist or push it slightly to ensure a proper fit. Use screws or clips that came with your new socket to secure it firmly. This ensures the socket remains stable when you plug devices in and out. A well-secured socket prevents potential damage and ensures longevity.
Testing The Installation
Now, it’s time to test your new installation. Plug a device into the socket, such as a phone charger or a portable fan, to see if it powers on. If everything is connected correctly, your device should start charging or operating immediately. If there’s no power, recheck your wiring connections. Make sure everything is tightly secured, and there are no loose wires. Testing ensures that your hard work pays off, and the socket is ready for everyday use. Replacing a car lighter socket might seem daunting, but it’s an achievable task. Have you ever thought about how much convenience a functional socket brings to your drives? From charging devices to powering gadgets, it’s a small change with significant benefits.
Troubleshooting Common Issues
Replacing a car lighter socket involves removing the old socket and installing a new one. First, disconnect the car battery for safety. Then, remove the trim panel to access the socket, unscrew it, and pull it out. Install the new socket by reversing these steps.
Replacing a car lighter socket can seem simple. Yet, common issues often arise during the process. This section helps you identify and troubleshoot these issues with ease. Understanding the problems can save you time and effort. Let’s explore some frequent challenges you might face.
Loose Connections
Loose connections are a frequent problem. They can cause the lighter socket to malfunction. Check the wiring behind the socket. Ensure all connections are tight. A loose wire can disrupt power flow. Use a multimeter to test the continuity. If the circuit is incomplete, reconnect the wires securely. Make sure the socket is firm in its housing. A wobbly socket can lead to poor performance.
Power Issues
Power issues can stem from several sources. First, check the fuse. A blown fuse can cut off power to the socket. Replace any damaged fuses with the correct type. Test the car’s battery voltage. Low battery power can affect socket functionality. Inspect the socket for corrosion or debris. Clean it carefully to ensure good contact. If power issues persist, consult a professional.
Socket Compatibility
Socket compatibility is vital for proper function. Not all sockets fit all car models. Check your vehicle’s manual for specifications. Ensure the replacement socket matches these requirements. Incompatible sockets can lead to installation problems. They might not fit or work correctly. If unsure, seek advice from an auto parts specialist. They can guide you to the right product for your car.
Maintenance Tips
Replacing a car lighter socket requires careful steps to ensure safety. First, disconnect the car battery to prevent electrical shocks. Then, remove the old socket by unscrewing it and unplugging the wires. Finally, install the new socket by connecting wires and securing it in place.
Replacing a car lighter socket might seem like a straightforward task, but ensuring its longevity requires attention to maintenance. Regular upkeep can prevent common issues like loose connections or faulty wiring. Let’s dive into some practical maintenance tips that will keep your socket in top shape and your car accessories running smoothly.
Regular Cleaning
Dust and debris can accumulate in your car lighter socket over time. Use a can of compressed air to gently blow out any particles. A clean socket ensures a better connection and reduces the risk of short circuits.
Inspect For Wear And Tear
Check the socket for any visible signs of damage. Cracks or corrosion can affect functionality. If you notice any damage, consider replacing the socket to avoid further issues.
Check Electrical Connections
Loose wires can cause intermittent power issues. Periodically inspect the connections behind the socket. Ensure that all wires are tightly secured and free from damage.
Test The Socket Regularly
Regular testing can help you catch problems early. Plug in a device you frequently use, like a phone charger, to ensure the socket is working properly. If you notice any issues, address them promptly.
Ensure Proper Fit
Accessories should fit snugly into the socket. A loose fit can lead to poor connections and overheating. If your devices aren’t fitting correctly, it might be time to replace the socket.
Use The Socket Responsibly
Avoid overloading the socket with high-power devices. This can lead to overheating and damage. Stick to using devices that are within the socket’s power capacity to extend its lifespan. Taking these maintenance steps can save you from unexpected breakdowns and keep your car’s electrical system in peak condition. What other maintenance tips have you found helpful? Share your insights in the comments!
Frequently Asked Questions
How To Remove Car Lighter Socket?
Turn off your car and disconnect the battery. Unscrew the retaining ring or nut holding the socket. Gently pull the socket out from the dashboard. Disconnect the wiring harness attached to the socket. Ensure the area is clean before replacing or installing a new socket.
How To Fix A Cigarette Lighter Plug In A Car?
Check the fuse box for a blown fuse and replace it. Ensure the lighter socket is clean and free from debris. Test with another device to confirm functionality. If still faulty, consult a professional to inspect the wiring.
How Do I Change My Car Cigarette Lighter Socket To Usb?
Replace your car’s cigarette lighter socket with a USB adapter. Simply plug the adapter into the lighter socket. Ensure compatibility with your device for efficient charging. Choose adapters with multiple USB ports for charging multiple devices. Installation is easy and requires no special tools.
Enjoy convenient USB charging on-the-go.
What Is A Cigarette Lighter Socket In A Car Called?
A cigarette lighter socket in a car is commonly called a 12-volt outlet or accessory power outlet. It provides power for charging devices and operating small electronics. This socket is found in most vehicles and is useful for connecting various car accessories.
Conclusion
Replacing a car lighter socket is simple and rewarding. Follow the steps carefully. Make sure you have the right tools. Disconnect the battery for safety. Remove the old socket gently. Install the new one with care. Test it to ensure it works.
Regular maintenance keeps your car in good shape. Save time and money by doing it yourself. Enjoy the satisfaction of fixing your car. Feel confident on your next road trip. With this guide, anyone can do it. Happy driving!